TEL:+86 132 6656 7067





MPO/MTP fiber assemblies are widely used in high-density data center cabling, particularly for parallel optical connections. Before deployment, each assembly should be checked for connector cleanliness, physical condition, fiber continuity, polarity, and optical insertion loss. Testing every fiber channel helps identify problems that may otherwise appear only after the cable is connected to switches or optical transceivers.
1. Why MPO/MTP Cable Testing Is Important
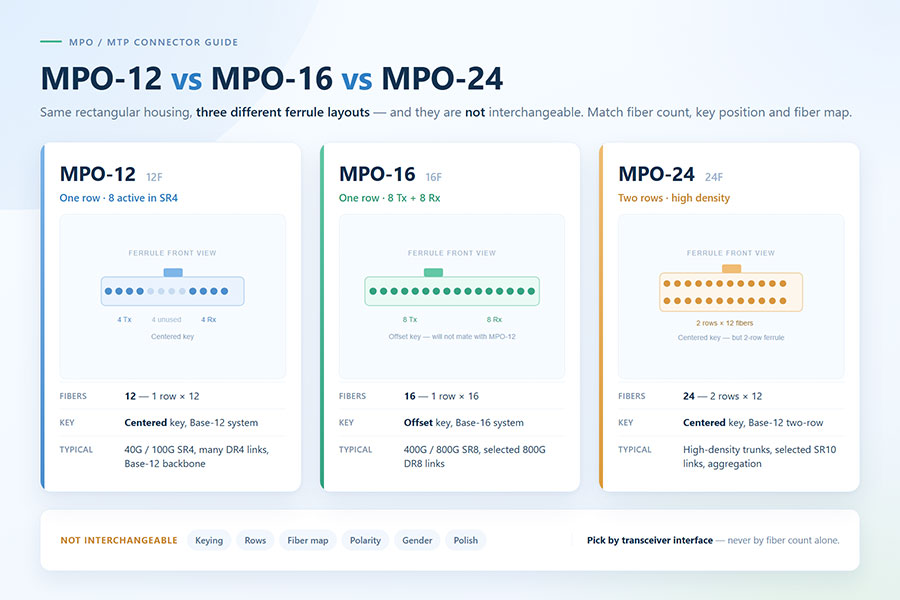
An MPO connector combines multiple optical fibers into one compact ferrule. Depending on the assembly, it may contain 8, 12, 16, or 24 fibers. This design reduces connector count and simplifies high-density cabling, but it also makes testing more complex than testing a conventional duplex LC patch cord.
A cable can have a normal external appearance and still contain problems such as:
Contaminated end faces: Dust or residue can increase insertion loss and affect optical contact.
Fiber damage: Scratches, cracks, or damaged fiber positions can interrupt transmission.
Incorrect polarity: Transmit and receive channels may not arrive at their intended positions.
Excessive insertion loss: One or more channels may exceed the link's available loss budget.
Connector mismatch: Pin configuration, key orientation, polish type, or fiber count may not match the mating interface.
2. Prepare the Correct MPO/MTP Test Equipment
The test equipment should match the connector configuration and fiber type of the cable assembly. Native MPO testing equipment is generally preferable for multi-fiber assemblies because it can measure multiple channels without repeatedly converting the connector into individual fiber connections.
| Test equipment | Primary function | What to verify |
|---|---|---|
| MPO/MTP inspection microscope | Inspects the complete multi-fiber end face | Suitable adapter, correct fiber count, inspection coverage |
| MPO cleaning cassette or cleaner | Removes contamination from the connector end face | Compatible with connector type and geometry |
| MPO polarity tester | Checks fiber mapping and channel order | Supports the required polarity configuration |
| MPO optical loss test set (OLTS) | Measures insertion loss across individual fibers | Supports the fiber type, connector, and reference method |
| Optical power meter and light source | Measures optical power and loss using suitable test interfaces | Correct wavelength, adapters, and reference setup |
| OTDR | Locates events and helps troubleshoot fiber links | Suitable launch/receive arrangements and measurement range |
For factory cable assemblies, automated MPO test systems can improve measurement efficiency and provide channel-by-channel results. For installed links, the selected method should also account for patch panels, adapters, and other connection points in the complete optical path.
3. Step One: Inspect and Clean the MPO/MTP End Faces
End-face inspection should be performed before connecting the assembly to another cable, test instrument, or optical transceiver. Multi-fiber connectors have a larger inspection area than LC connectors, so the microscope must cover every fiber position.
What to inspect
Dust, oil, and other contamination on individual fiber end faces.
Scratches, chips, cracks, or other physical damage.
Contamination around alignment pins and guide holes.
Correct end-face condition across the entire fiber array.
Recommended inspection process
Use a compatible video inspection probe to examine the connector.
Check all fiber positions rather than inspecting only the center of the ferrule.
Clean the connector using an approved MPO/MTP cleaning tool when contamination is detected.
Inspect again to confirm that the end face is clean.
Keep protective caps installed whenever connectors are not being tested or connected.
4. Step Two: Verify Fiber Continuity and Polarity
Continuity testing confirms that the individual fibers provide an optical path from one end of the cable to the other. Polarity testing goes further by confirming that each fiber arrives at the intended position.
This distinction is important because an MPO cable can have continuity across all fibers while still having an incorrect channel arrangement for the intended network connection.
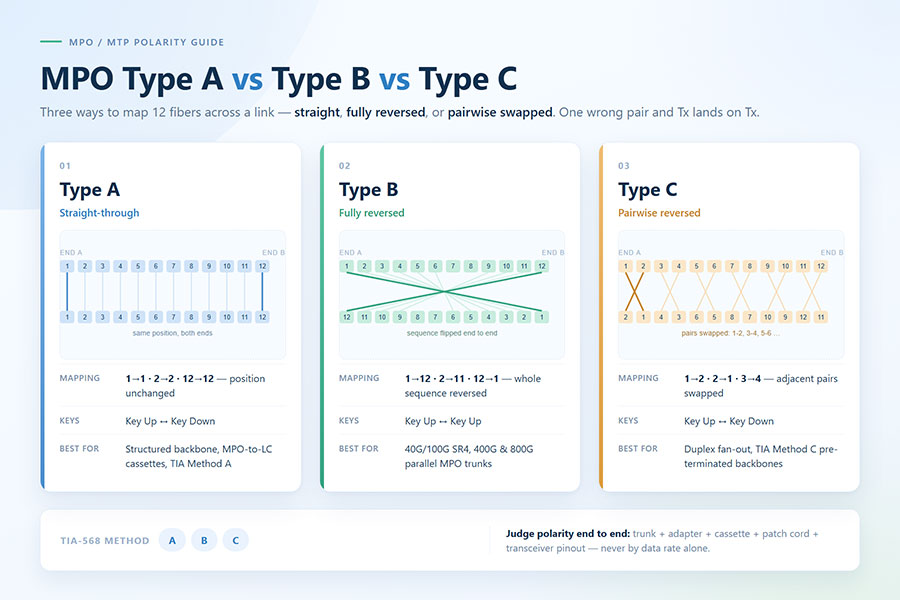
Common MPO polarity configurations
| Polarity type | General arrangement | Application consideration |
|---|---|---|
| Type A | Straight-through fiber position mapping | Fiber positions remain in the same sequence from end to end. |
| Type B | Reversed fiber position mapping | Fiber positions are reversed across the connector. |
| Type C | Pair-reversed mapping | Adjacent fiber pairs are reversed. |
The required polarity depends on the optical application, transceiver design, and complete cabling architecture. Do not select Type A, B, or C based only on connector appearance.
What a polarity test should confirm
Every expected fiber position has continuity.
Transmit and receive channels are mapped correctly.
The connector key orientation matches the intended connection.
The cable's actual fiber mapping agrees with its label and deployment documentation.
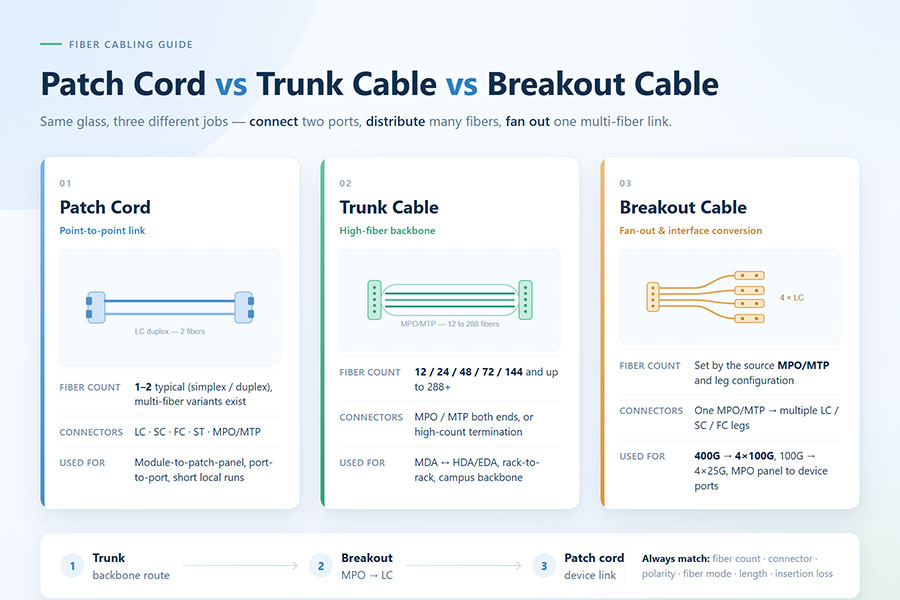
For breakout assemblies, verify the mapping between each MPO position and its corresponding LC or other individual connector. Record the channel mapping so that installation technicians can connect the correct ports.
5. Step Three: Measure Optical Insertion Loss
Insertion loss (IL) measures the optical power lost as light travels through a fiber assembly or installed link. It is one of the most important measurements for determining whether an MPO/MTP cable can meet the requirements of the intended optical application.
An optical loss test set (OLTS) uses a light source and power meter to establish a reference and measure the received optical power. MPO-capable test equipment can measure multiple fiber channels through a compatible multi-fiber interface.
Basic insertion-loss testing workflow
The insertion-loss measurement can be expressed as:
For example, if the reference power is -2.0 dBm and the measured power is -2.8 dBm, the measured insertion loss is 0.8 dB.
Testing should use the correct wavelength and launch conditions for the fiber type. Where the applicable certification procedure requires bidirectional measurements, both directions should be tested and recorded.
6. Step Four: Check the Loss Budget and Channel Results
A measured insertion-loss value should never be judged in isolation. The acceptance limit depends on the optical application, cable length, fiber category, connector count, splice count, and applicable standard.
For a complete installed link, the available optical loss budget must account for all components between the transmitter and receiver.
| Loss contributor | What it represents | Testing consideration |
|---|---|---|
| Fiber attenuation | Optical power reduction along the fiber length | Depends on fiber type, wavelength, and length. |
| MPO connector pairs | Loss at mated multi-fiber interfaces | Inspect cleanliness, alignment, and connector condition. |
| LC or other breakout connectors | Additional loss at individual fiber interfaces | Include these connections when testing the complete link. |
| Splices | Loss introduced by fiber joining | Account for splice count and measured performance. |
| Patch panels and adapters | Loss from additional connection points | Include every connection in the deployed optical path. |
For MPO assemblies, inspect the worst-performing fiber channel. A connector should not be accepted merely because the average loss across all fibers is within the target range.
7. Step Five: Use OTDR Testing When Deeper Troubleshooting Is Needed
An optical time-domain reflectometer (OTDR) sends optical pulses into a fiber and analyzes the returned signal. It can help identify the location of events such as connector loss, splices, bends, and fiber breaks.
OTDR testing is particularly useful when an insertion-loss result fails and the source of the loss needs to be located.
What OTDR testing can reveal
Unexpected attenuation along the fiber.
High-loss connection points.
Fiber breaks or major damage.
Potential bending-related loss.
Abnormal reflective events.
For MPO assemblies, OTDR testing commonly requires suitable breakout arrangements to access individual fibers. The test setup must account for additional connectors introduced by the breakout leads.
Short data center links can be challenging to characterize with an OTDR because closely spaced events may fall within the instrument's event dead zone. Appropriate launch and receive fibers, pulse settings, and test procedures are therefore important.
OTDR is generally a troubleshooting and characterization tool rather than a replacement for OLTS insertion-loss certification.
8. Step Six: Verify the Cable Label and Physical Configuration
Optical test results are only useful when they can be associated with the correct cable assembly. Before deployment, verify that the physical cable configuration matches the network design and test documentation.
Fiber count: Confirm 8-, 12-, 16-, or 24-fiber configuration as ordered.
Fiber type: Confirm single-mode or multimode fiber, including the required category.
Connector type: Check MPO/MTP connector type and mating compatibility.
Pin configuration: Verify pinned and unpinned connector requirements.
Polish type: Confirm APC or UPC where applicable; these interfaces must not be treated as interchangeable.
Polarity: Confirm the required Type A, B, or C mapping.
Cable length: Check that the assembly matches the installation plan.
Identification: Ensure cable labels and channel mapping are readable and consistent with test records.
9. MPO/MTP Pre-Deployment Test Checklist
The following checklist can be used as a practical acceptance record for factory assemblies or structured cabling projects.
| Inspection item | Acceptance requirement | Result |
|---|---|---|
| Connector appearance | No visible physical damage | Pass / Fail |
| End-face inspection | All fiber positions meet applicable inspection criteria | Pass / Fail |
| Connector cleanliness | Clean after inspection and cleaning process | Pass / Fail |
| Fiber continuity | All expected fibers provide continuity | Pass / Fail |
| Polarity | Correct mapping for the target application | Pass / Fail |
| Insertion loss | Every channel meets the specified loss limit | Pass / Fail |
| Fiber type and count | Matches the order and network design | Pass / Fail |
| Connector configuration | Correct key, pin, and polish configuration | Pass / Fail |
| Test documentation | Results and cable identification recorded | Pass / Fail |
10. Common MPO/MTP Testing Problems and Solutions
| Problem | Possible cause | Recommended action |
|---|---|---|
| One or more channels show high insertion loss | Contamination, connector damage, poor alignment, or a damaged fiber | Inspect and clean both interfaces, then repeat the measurement. |
| All channels show unexpectedly high loss | Incorrect reference setup, worn reference cords, or incompatible test interfaces | Check the reference procedure and test equipment condition. |
| Continuity passes but the link does not work | Incorrect polarity or incompatible channel mapping | Verify the complete fiber map against the application requirements. |
| Connector cannot be mated correctly | Pin configuration, key orientation, or connector type mismatch | Confirm the mating interface before connecting. |
| OTDR results are difficult to interpret | Short link length, dead zones, or additional breakout connections | Review the test setup and use appropriate launch and receive fibers. |
| Results vary between repeated tests | Dirty or worn reference connectors, unstable connections, or inconsistent setup | Inspect reference cords, clean interfaces, and repeat using the same method. |
11. C-LIGHT MPO/MTP Fiber Cable Solutions
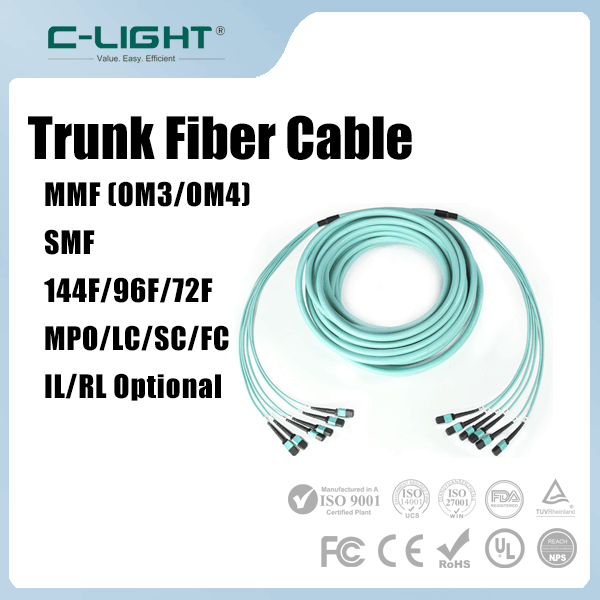
C-LIGHT provides multi-fiber cable assemblies for high-density optical cabling environments. These products are used in data center infrastructure, structured fiber distribution, and parallel optical transmission applications.
MPO-MPO Fiber Patch Cable
C-LIGHT MPO-MPO Fiber Patch Cable provides MPO connectors at both ends for direct multi-fiber connectivity.
Available fiber counts include 8, 12, and 24 cores.
Single-mode G657A2 and multimode OM3/OM4 configurations are listed.
Designed for compatible high-density parallel optical cabling.
The product page lists insertion loss of no more than 0.5 dB for supported assemblies.
MTP-MTP Fiber Patch Cable
C-LIGHT MTP-MTP Fiber Patch Cable provides MTP connectors at both ends for compatible high-density optical connections.
Available 8-, 12-, and 24-fiber configurations.
Single-mode G657A2 and multimode OM3/OM4 options.
Suitable for compatible parallel optical network architectures.
Product specifications list insertion loss of no more than 0.5 dB for supported assemblies.
Quality Verification Before Deployment
For an MPO/MTP cable project, the required inspection and test scope should be confirmed before production or shipment. This can include connector inspection, fiber mapping, polarity verification, insertion-loss measurements, and a channel-by-channel test report.
For assistance with cable configuration, fiber count, connector type, polarity, or customized assemblies, Contact C-LIGHT.
12. Conclusion
Testing MPO/MTP fiber cables before deployment is essential for reliable high-density optical connectivity. A complete verification process should include end-face inspection, cleaning, fiber continuity, polarity confirmation, and insertion-loss measurement across every channel.
OTDR testing can provide additional troubleshooting information when a link fails or its loss characteristics need further investigation. However, acceptance should be based on the correct test method and application-specific limits, with all results recorded against the cable's identification and fiber mapping.
By verifying the cable assembly before installation, network operators can reduce commissioning problems and improve the reliability of high-speed data center connections.
 >

 >
 >
 >
 >
 >
 >
 >